In this guide, we use an iPhone as an example. Guides for other devices will generally refer to this guide, as the process is generally the same but with some slight variations depending on where you set up the calendar. Therefore, you will also find specific help for other devices/OS below.
Outlook: Guide for syncing to Outlook calendar
Android: Android calender guide.
Since there are several different ways to share a calendar, this guide is divided into the following sections, depending on how you want to use and possibly share your calendar.
- Create a personal calender with device synchronization
- You have your own calendar that you want to be able to access and synchronize across multiple devices, for example, between your phone and Outlook.
- Share a personal calendar
- You want to share your calendar so that others can view it and possibly edit your personal calendar.
- Create a shared calendar for multiple users
- You and your colleague want to have a shared calendar where both of you can create/edit events.
Create a personal calender with device synchronization
With our calendar system, you can synchronize your calendar between your devices, and you can also share calendars with others. However, in this section, we will focus on creating a personal calendar that can be synchronized between your devices.
Use case: You have your own calendar that you want to be able to access and synchronize across multiple devices, for example, between your phone and Outlook.
Start by going to Settings -> Apps -> Calendar -> Accounts -> Add account and Add CalDAV account as shown below:
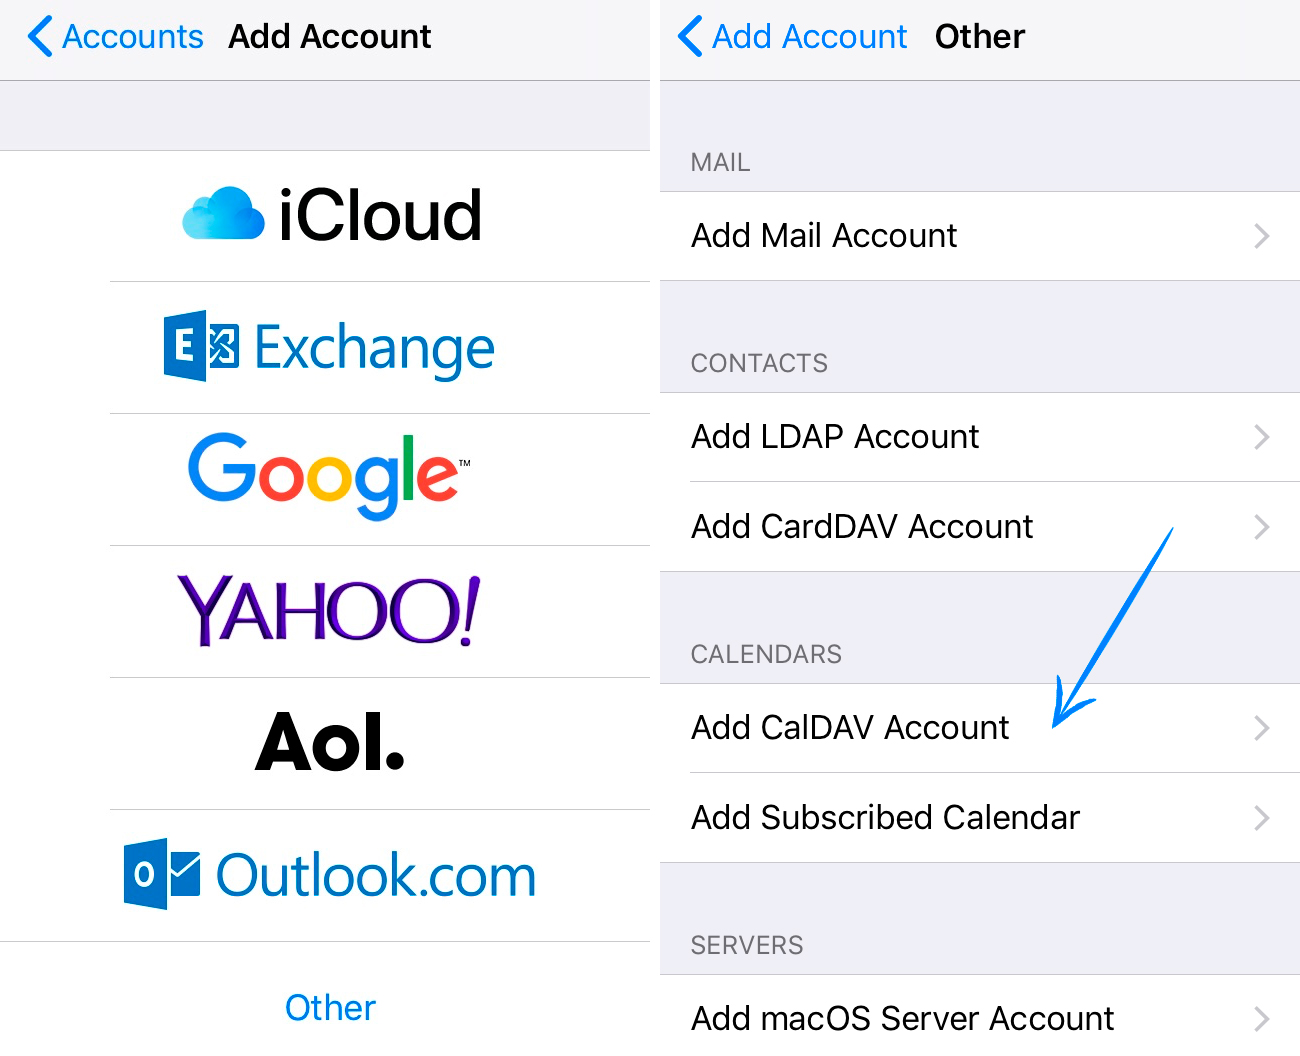
When choosing the type, select "Other":
Then set up your account as shown below:
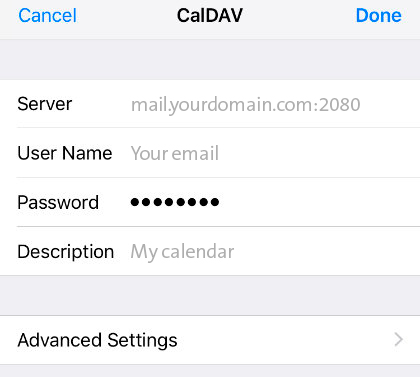
Important:
- As the server, enter "https://mail.yourdomain.com:2080/. Be sure to replace yourdomain.dk with your own domain.
- As the username, use the email address for which you are setting up the calendar.
- The password is the same as the one you use for the respective email.
When you press Next, your calendar connects to our server, and you are now ready to create events in your calendar that can be synchronized across multiple devices.
The calendar cannot handle invitations from other systems like Outlook or Gmail. If the calendar function is very important to you, we recommend considering Google Workspace or MS365. Otherwise, treat this as a way to synchronize your own appointments between devices.
Share a personal calendar
You can share your personal calendar with other users on your account.
Use case: You want to share your calendar so that others can view it and possibly edit your personal calendar.
- In cPanel, select "Calendars and Contacts Sharing".
- In "Select user", choose your own calendar.
- In "Select collection", choose your calendar.
- In "Share with", select the user you want to share your calendar with.
- Choose whether that user is allowed to edit your calendar events.
- Click the "Create" button.
The person who now needs access to the calendar must add it to their device. They should follow the guide above (Create a Personal Calendar with Synchronization) but note that they need a different CalDAV URL. The URL looks like this:
https://mail.yourdomain.com:2080/calendars/mail@yourdomain.com/calendar/
Replace yourdomain.com with your own main domain and mail@yourdomain.com with the correct email address. The username and password are the same as for your own account. If my domain was called greathostingnews.com and I had the email contact@greathostingnews.com the URL would look like this: https://mail.greathostingnews.com:2080/calendars/contact@greathostingnews.com/calendar/
Complete all steps and you should now have access to the shared calendar.
Create a shared calendar for multiple users
It is possible to create a calendar that can be shared by multiple users.
Use case: You and your colleague want to have a shared calendar where both of you can create/edit events.
- In cPanel, select "Calendars and Contacts Management".
- Click the "Create" button and fill in the required fields.
- In cPanel, select "Calendars and Contacts Sharing".
- Select your default user (username). In "Select collection", choose your new calendar, and then choose whom to share with. Click "Allow editing" if the selected user is allowed to make changes. Repeat this for all users who need access.
- All users can now add the calendar according to the guide above (Create a Personal Calendar with Synchronization). The only difference is the CalDav URL you need. Click "Calendars and Contacts Configuration" and scroll down to "Secure SSL/TLS URLs". Use the URL next to the newly created calendar when setting it up. It should look something like this: https://mail.yourdomain.com:2080/calendars/yourdoma/calendar-3d236133-abc7-44e6-ba40-05c52c3accce/